on
Implementing a rate limiter for our API in Rust

In this blog post I want to talk about rate limiting and why you should probably care in the context of APIs development.
The first half I'll focus on the principles of rate limiting and the most common solutions. Finally, I'll go through how to build a rate limiter, written in Rust and based on Redis.
Table of contents
Here is the complete list of topics I'll touch in this article:
Let's start!
What is rate limiting
Rate limiting is a technique used to make sure that an operation/service is executed/requested within certain limits. Basically, it's a defensive measure that prevents the excessive consumption of a resource.
Our focus
Whilst the principles of rate limiting can be applied to a wide range of disciplines, in this article I'll focus on its use in the context of software engineering, specifically in the context of API development.
Why rate limiting is important
There are multiple reasons to adopt rate limiting on your services, let's see the main ones.
A shield for our infrastructure
The most common and basic need is to protect our services from resources starvation. Let's say that one of our REST endpoint internally deals with some heavy database query, or does an expensive network call to an enterprise service bus, which is constantly under high pressure - not a very infrequent scenario. In such conditions, rate limiting is a simple yet powerful trick to prevent undesired, self-induced denial of service and cascading failures.
To meet our quality standards
Keeping control of the maximum allowed requests on our services does not simply shield the underlying infrastructure, but also help us meeting the desired availability and performance goals, thus the quality of our service as experienced by our customers. If we know what's our system breaking point, there's no point in letting our traffic reaching that, as we know that our services would not behave as good as when in normal circumstances.
For service quotas
Rate limiting relates as well to the concept of service quotas. Perhaps we want our service to allow a different rate of requests based on the pricing plan on which our users are running. Or, since we know that our service is used worldwide by millions of people, we want to provide everybody a reasonable and fair experience, without affecting other consumers.
Our billing guard
Last but not least, rate limiting is also our friend when it comes to save some money. This is particularly relevant in the context of infrastructures hosted on cloud providers, that give us the option to infinitely scale our services, either vertically or horizontally. Defining a maximum of parallel requests for our service is a simple yet effective way to prevent an auto scaling rule to completely drain our budget.
Local vs distributed
In the world of distributed systems, we must differentiate between local and distributed rate limiters implementations: local refers to solutions which are self-contained on a single service instance or replica, thus having a local state. With distributed instead we mean a component whose state is remote and shared across different service units, independent from each other.
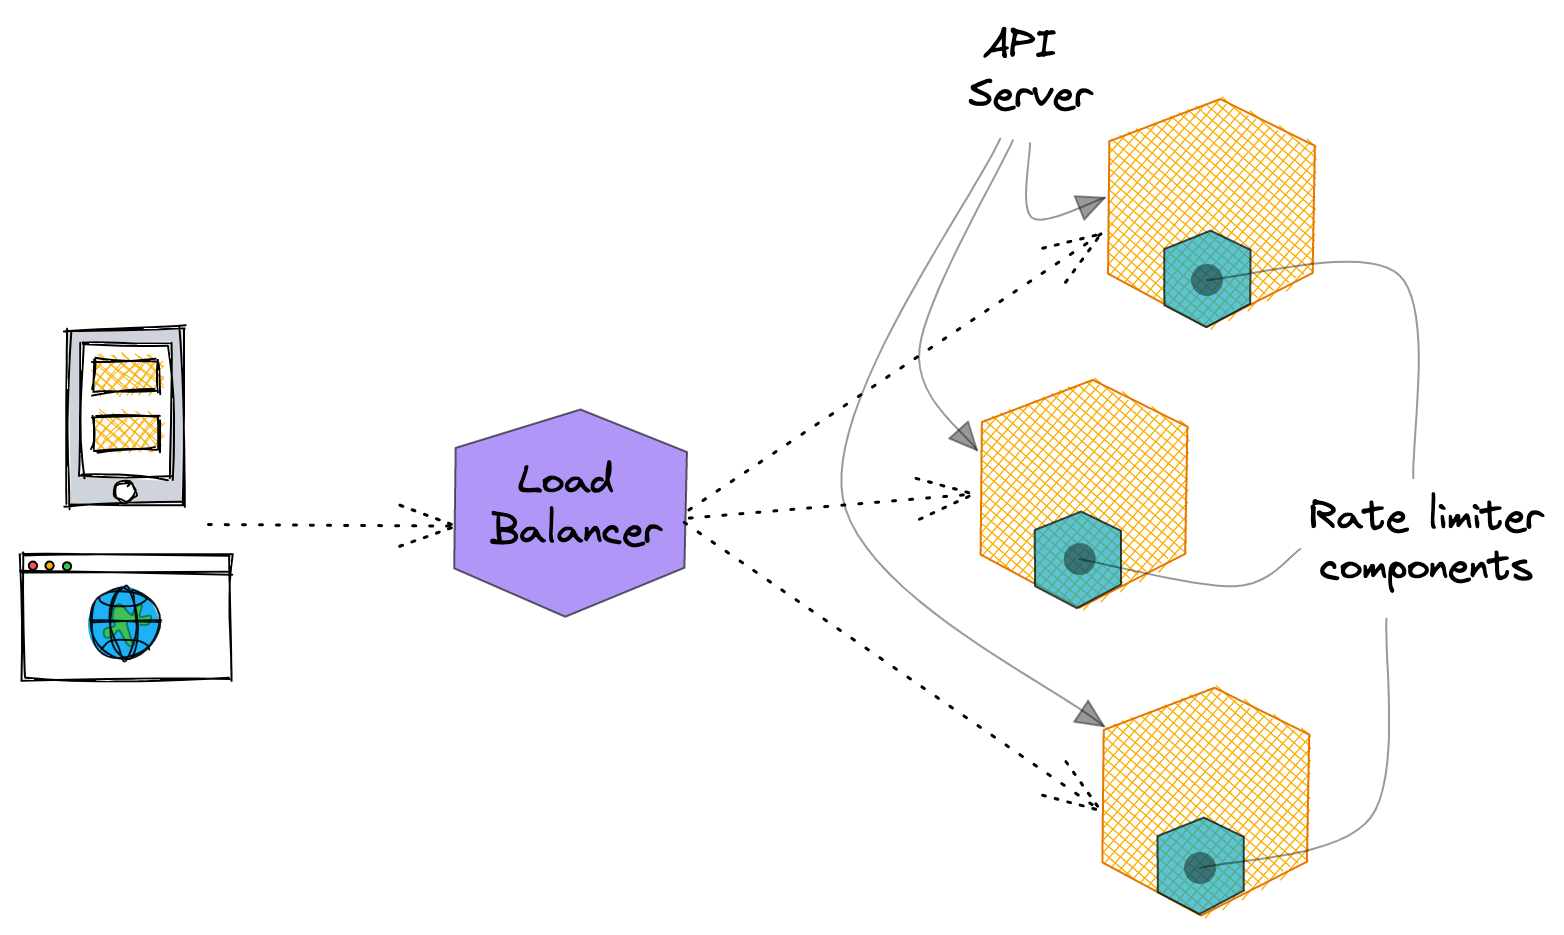
Local rate limiters are usually simpler to implement: their state is kept in the local, ephemeral memory of a specif service instance.
As each rate limiter instance is isolated, we don't have to care about synchronizing accesses/changes to the internal state across multiple services, but just across multiple threads/listeners. Choosing a language that offers a strong support for working in a multi threaded context (like Rust, for instance) is already half the battle.
Local/in-memory rate limiters might be a good fit if:
- In the unlikely case you run a single instance of your service;
- You have some sort of session stickiness in place that lets you route requests coming from the same origin to the same instances;
- You're mostly concerned with protecting your infrastructure and keep control of your cloud provider billing; You don't care much if one of your customers exceeds its service quotas/limits;
- You're doing a POC and you want to start simple and progressively improve;
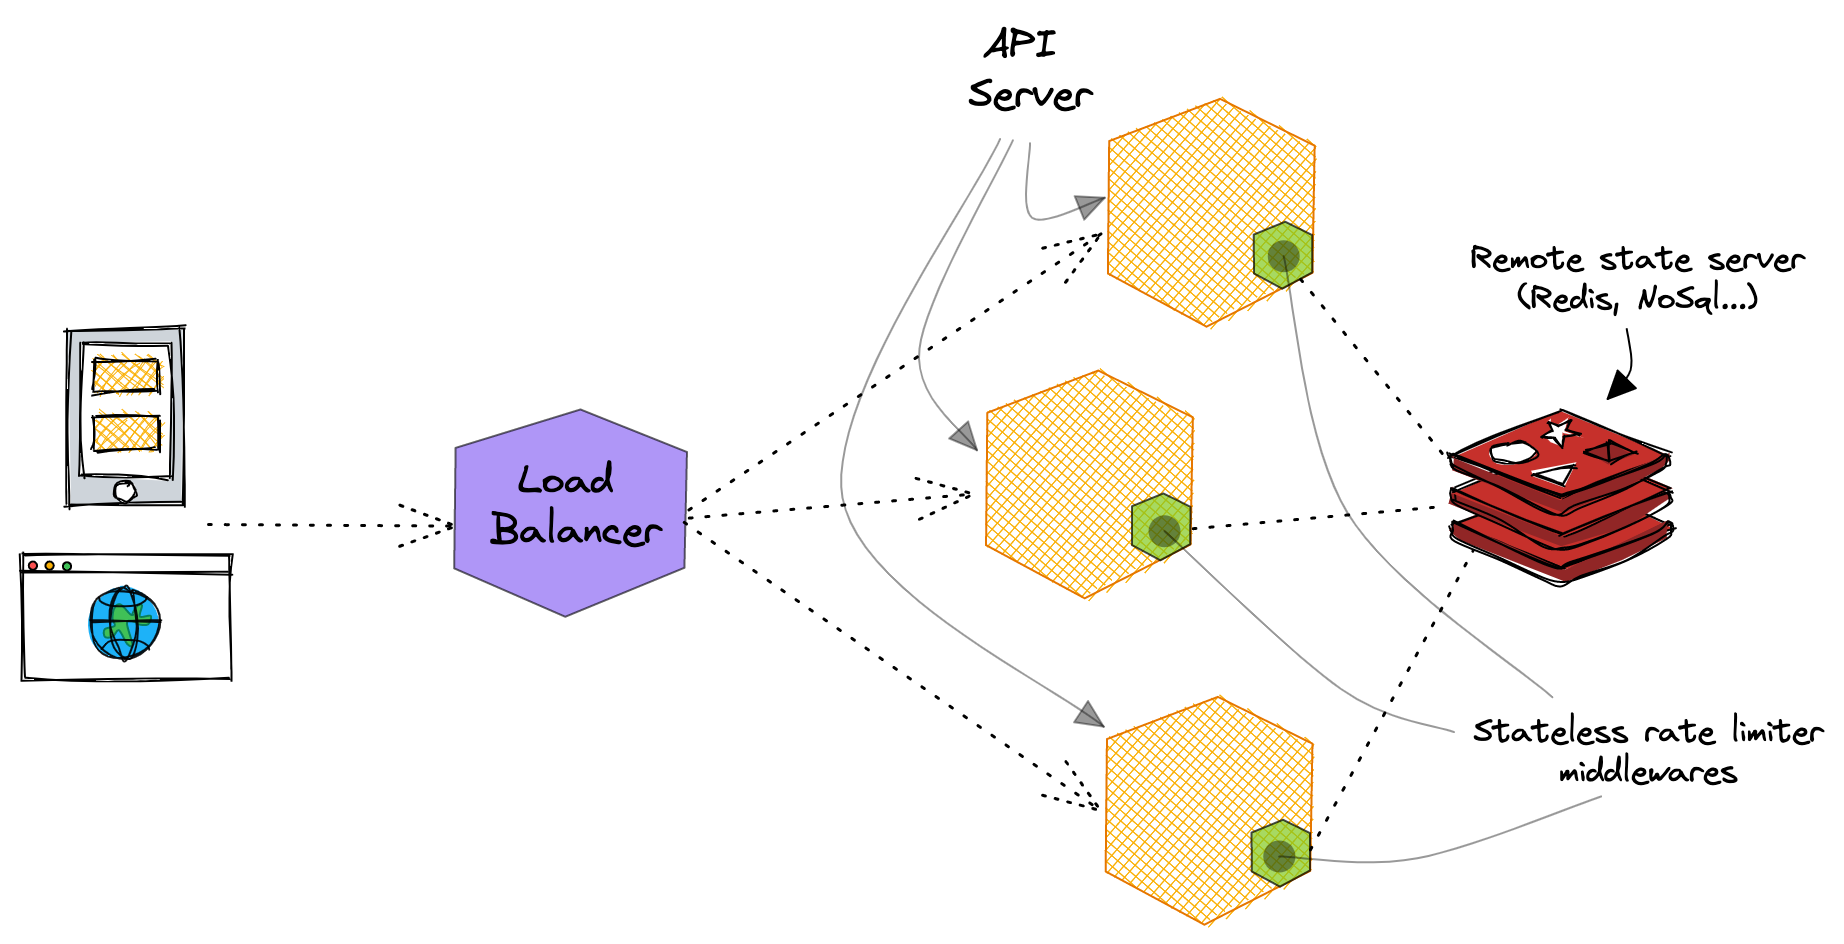
Distributed rate limiters are instead a different beast to tame. First of all, unlike local ones, they have to store their state in a shared cache or a low-latency storage system, like a NoSQL database.
As such, distributed rate limiters usually come with an extra provisioning effort as well as an operational and hosting cost. Moreover, compared to in-memory solutions, they're way more exposed to the likelihood of race conditions, as the same origins/clients can fire multiple simultaneous requests to different servers which are internally competing for the same resources. Locking, either pessimistic or optimistic, or both combined, is an opinionated approach mitigate/solve this kind of issues.
That being said, distributed rate limiters are a much better fit for proper service quotas checks, and generally in service oriented/microservices architectures, usually made of ephemeral, stateless and round-robin load balanced service instances/pods.
Known algorithms
As far as I'm aware, there are 4 main, well-known algorithms for building a rate limiter.
Token bucket
The Token bucket algorithm is probably the simplest to reason about amongst the 4 algorithms. A token bucket is a container with a prefixed size, where each token relates to a request. The bucket is refilled at a predefined, fixed rate and it can contain a number of tokens up to its size. When a request comes in, if there's at least one token, it consumes a token and executes normally. Alternatively, if there are no tokens to consume, the request is dropped.
The biggest advantage of this algorithm is its flexibility: it's a great fit for both regular traffic and bursts of requests in short periods of time. On the flip side, the implementation of its refill mechanism might not be so simple, and its bucket size and refill rate configurations might be a bit tricky to tune.
It's widely adopted in the industry, including by big players like Stripe or Deliveroo.
Leaky bucket
The Leaky bucket algorithm is similar to the Token bucket one, but it executes requests at a regular rate with the help of a processing FIFO queue. When a request comes in, the algorithm checks the state of the queue: if it's full, the request is dropped, otherwise it's added at the end of the queue.
Similarly to the previous algorithm, it comes with two parameters: queue size and outflow rate, representing respectively the maximum number of requests that a rate limiter can handle and the (constant) execution rate of our requests.
Due to its internals, this algorithm is a perfect fit for use cases with a kind of stable rate of requests, or when you can afford processing requests at constant rate, regardless of the traffic experienced at the edges of your service. If your application has to deal with frequent and irregular burst of requests, by using a leaky bucket rate limiter you might end up dropping a non negligible amount of requests.
Shopify uses this algorithm on their APIs.
Fixed window
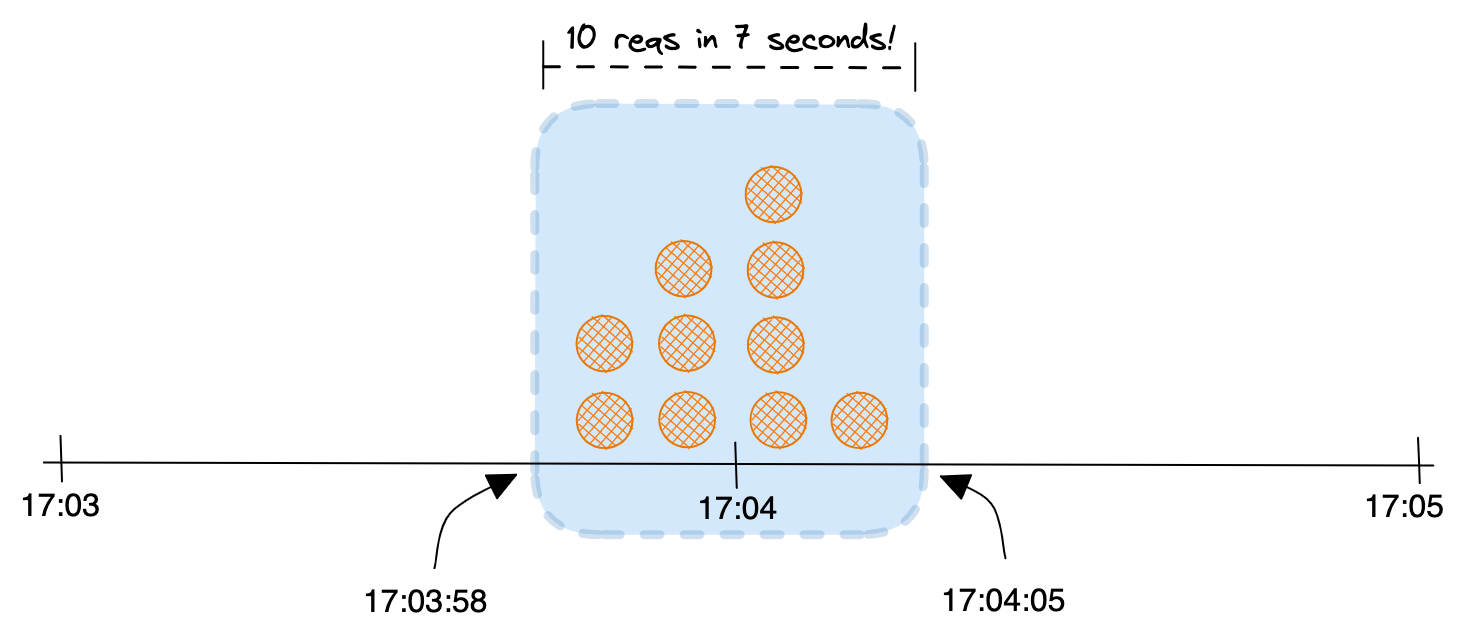
Differently from the above 2 approaches, this algorithms divides the timeline into fix-sized time windows with a predefined maximum of requests supported for each of them. When a request arrives, it increments a counter representing the number of requests executed in the same window. If the updated counter is higher than the predefined threshold, the request is dropped, otherwise it can execute.
The biggest advantages of this approach are its simplicity and its low memory footprint. On the other side, burst of traffic at the edges of two adjacent time windows can lead to the execution of more requests than the ones defined by our quotas. With the help of an example, let's imagine a window size 5 and a duration of 1 minute. As time windows are independent from each other, there's nothing that could prevent 10 requests happening between 17:03:58 and 17:04:05. From the perspective of our algorithm such traffic would be totally legit, as we would handle five request in each of the 17:04 and 17:05 windows, but we would end up accepting 10 requests in approximately 7 seconds, which might be inconvenient if not unacceptable for our use case.
Sliding window
The Sliding window algorithm tries to improve the previous approach by keeping track of the history of requests. When a request comes in, it subtracts the window duration to the current timestamp and removes all the existing requests which are older than the newly computed window. Then, it adds the new timestamp to the history of requests and finally checks whether the request can execute or not: if the counter of request, including the current one, is same or lower than the the allowed maximum, the request is accepted. Otherwise, it's dropped.

The major drawback of this algorithm is its potential impact on memory, especially especially if you have a long window duration (eg: hours).
Cloudflare leverages a sliding window - though improved, memory efficient - algorithm to mitigate L7 DDoS attacks.
Expressiveness at the API level
Whilst there are multiple ways to implement a rate limiter, how rate limiting errors are expressed at the API level is quite standard.
Back in 2012 the IETF officially introduced a new 429 HTTP status code and a Retry-in response header precisely for this purpose.
RFC 6585 states that
The 429 status code indicates that the user has sent too many requests in a given amount of time ("rate limiting").
The response representations SHOULD include details explaining the condition, and MAY include a
Retry-Afterheader indicating how long to wait before making a new request.
The combination of the HTTP status code and header makes the error very explicit for clients and helps building very accurate user experiences and/or efficient API integrations.
Building a rate limiter
Now that we have discussed some of the theoretic fundamentals of rate limiting, we can finally get our hands dirty with some code. In this hands-on section of the article we'll see how to build a rate limiter, test it and finally use it in a sample API project.
Our requirements
First and foremost, let's define some requirement for our rate limiter:
- It should be used on an API to keep control of incoming requests. As such, it will be a server-side component/library;
- It should limit requests based on the IP of the caller;
- It should allow up to 5 requests per minute from the same IP address;
- Our limits should be respected regardless of how the rate limiter is hosted. In other words, our checks should be accurate even if our service is hosted on multiple service replicas at the same time;
- In case of rate limiter internal errors, it will be up to the overarching API to decide whether to allow or throttle the request.
- If a request is allowed, it should return to the users the remaining request budget. If a request is throttled, it should suggest when to retry the next request.
Our tech stack
The fact that our rate limiter has to be distributed gives us already an important implementation constraint: in order for our requests checks to be accurate, the state of the rate limiter must be remote. Moreover, as we do not have strict service quota checks to respect, it might be sensible to start with a simple implementation.
In its first iteration our rate limiter will be an implementation of the Fixed window algorithm and we'll leverage Redis for our remote state management.
Remote state management
Redis is a in-memory data store, designed for low latency and bundled with a bunch of neat features that we can really leverage to keep our implementation simple and powerful at the same time.
Thanks to its basic features, and the more advanced WATCH and MULTI commands, Redis is a very nice fit for a simple solution yet resilient to concurrency issues.
Why Rust
For this experiment I decided to use Rust.
As I said in the first part of this post, picking a language that has a first-class support for concurrency is half of the job when building a rate limiter. Whilst this is very true for Rust, I can't say it was the real driver for my decision in this case: we'll solve most of the concurrency challenges with the help of Redis commands.
I decided to go with Rust here mostly for my personal interest: I wanted to get a bit more familiar with the language as well as ecosystem and the tooling. I wanted to test my productivity with something which was outside the comfort zone provided by my current company code bases and internal libraries (Yes, we write a lot of Rust in TrueLayer).
Github repository
All code snippets below are taken from my public rate-limiting project on Github - Feel free to contribute and/or giving it a ⭐️ if you like.
Implementation details
Let's start by defining the basic interface trait of our rate limiter component.
Our main trait
Simply put, our rate limiter component should accept a request and return whether that can be executed or not.
This is how we can model our basic functionality:
pub trait RateLimiter {
    /// Method that checks whether a request is allowed or should
    /// be throttled instead.
    /// Returns an error if unable to check, usually due to
    /// issues connecting to the underlying Redis instance.
    fn check_request(
        &self,
        request_identifier: RequestIdentifier,
    ) -> Result<RateLimiterResponse, RateLimiterError>;
}
One of the strengths of Rust is its type system. Rust does not have exceptions and thanks to the Result type we can really design an expressive interface for our rate limiter component.
Our check_request function will accept an enum RequestIdentifier which can model either an IP address (with the help of the standard IpAddr type) or a custom request identifier, made of a key value pair.
When I originally wrote the code, I wanted to give some more flexibility to our rate limiter going beyond the sole IP address use case, but in the context of this article, we can completely ignore the Custom variant.
/// Enum that represents the possible input types for our rate limiter
#[derive(Clone)]
pub enum RequestIdentifier {
    /// An Ip address. Used when we want to rate limit requests based on
    /// the Ip address from which the request was fired
    Ip(IpAddr),
    /// A custom identifier in a string format. Used when we want to rate
    /// limit based on custom criteria, like a client identifier.
    Custom { key: String, value: String },
}
The same check_request method will return either a RateLimiterResponse enumeration to model proper rate limiter responses or a RateLimiterError enumeration in case of internal errors while computing our limits checks.
Each variant included in the RateLimiterResponse enum will have their own, specific fields.
pub enum RateLimiterResponse {
    /// variant for requests that are allowed
    RequestAllowed(RequestAllowed),
    /// variant for requests that are throttled
    RequestThrottled(RequestThrottled),
}
In case of a successful request check, we want our users to know how many requests they can fire after the one just happened. We're conveying this information with the help of a remaining_request_counter field on our RequestAllowed variant.
/// Struct for requests that are allowed by the rate limiter
#[derive(Debug)]
pub struct RequestAllowed {
    /// the updated counter of available requests for the given ip/custom
    /// request id
    pub remaining_request_counter: u64,
}
Alternatively, if a request cannot go through because our users have already reached the maximum number of requests in the current window, we want to suggest them when
to expect the next request to succeed again with a retry_in field of type Duration, which can then
be converted to the desired time unit (usually seconds).
/// Struct for requests that are throttled by the rate limiter
#[derive(Debug)]
pub struct RequestThrottled {
    /// a duration representing when the user should retry the request
    pub retry_in: Duration,
}
Finally, if we're unable to check the request limits due to an internal error, we'll let our users know with a RateLimiterError type, which can surface
a few different internal errors.
/// Enum that represent the error potentially returned by the rate
/// limiter component
#[derive(thiserror::Error, Debug)]
pub enum RateLimiterError {
    #[error("Init error")]
    InitError(#[source] RedisError),
    #[error("Compute error")]
    ComputeError,
    #[error("Connect error: {0}")]
    IoError(#[source] RedisError),
}
Whilst this list is only partial, it's probably more than enough for our first iteration of the rate limiter. Note how this struct is decorated with shorthands included in the thiserror crate to improve the readability of inner errors.
Last but not least, note how the above type and function declarations are kept very generic: we don't want to pollute our contracts with any implementation details.
Our rate limiter instance
So far we spoke about our contracts but we haven't touched on our concrete type yet. As our rate limiter will implement the Fixed window algorithm, we should expect two attributes on our main struct: our window should have a size and duration.
Lastly, as our component will use Redis under the hood, we should probably as well expect a client to be included in the same rate limiter concrete type. We'll use this redis crate to interact with our instance.
With all this requirement in mind we can finally define our concrete FixedWindowRateLimiter struct:
#[derive(Clone)]
pub struct FixedWindowRateLimiter {
    /// The size of the window, that is the maximum number
    /// of requests that the rate limiter will allow for a time equal
    /// to the _window_duration_
    pub window_size: u64,

    /// Represents how long the window should be considered valid.
    /// This can be considered as the equivalent of the refill rate
    pub window_validity: Duration,

    /// The internal client that will be used to fire requests
    /// against Redis
    pub redis_client: redis::Client,
}
To initiate our rate limiter instance we can simply go ahead with the classic struct initialization syntax in Rust, or doing something fancier with the help of a builder pattern. We're gonna skip these bits here, as not really relevant for what we want to build.
Instead, we can now move to the juicy details of our specific rate limiter implementation.
Our algorithm
As mentioned, we'll leverage Redis native commands to implement our checks. Let's now try to design our algorithm, conscious of the Redis offering.
We can use a Redis key as counter for our requests: its name will be made of the IP address of the request, and its value will keep the updated counter of requests received from the same IP address in the current window.
When a request comes in we have to:
- Increment our key by 1. if not existing, create a key with an initial value of 0;
- Get the updated counter and
- Block the request if the counter is above our window size, and suggest when to retry;
- Otherwise, let the request execute and return the updated request budget.
To save some memory we'll also associate an expiration to our key, equals to the window duration, so that we can eventually clean up our state, even if no request are coming after the first one. We can place this step soon after the first instruction above.
Notice how our implementation slightly diverges from the definition in the first part of this article: the start of our window won't be bound to the beginning of a minute, but it will be equal to the timestamp of the first request received from an IP address. We're doing this mostly because we're leveraging Redis keys expirations. Only accidentally, such choice will also mitigate a bit more - not solve! - the limits overflow problem described in the Fixed window algorithm section.
On the shoulder of Redis
Translated into Redis instructions, the above steps will look like this:
INCR $key_name: Increment$key_nameby 1. If not existing, create a$key_nameand set it to 0EXPIRE $key_name $window_duration_seconds NX: associate an expiry of$window_duration_secondsto the key, if not existingTTL $key_name: get the updated expiry of the key
Finally, as mentioned already, one of the reasons why I picked Redis was its support for locking, to help us dealing with concurrent updates. To make the above sequence resilient to race conditions, we have to basically treat that as an atomic command, and make sure we prevent concurrent modifications to the same key.
We can do that with the help of transactions!
WATCH $key_name
MULTI
... our commands ...
EXEC
UNWATCH
We can surround our 4 statements with a MULTI / EXEC block to implement atomicity, and with a WATCH / UNWATCH guard on our key we can stop any potential concurrent modification from happen: if our key is modified after the WATCH instruction above by another process before being UNWATCHed, the whole transaction aborts.
Therefore, our sequence of commands will eventually look like this:
WATCH rl:ip_192.168.224.6
MULTI
INCR rl:ip_192.168.224.6
EXPIRE rl:ip_192.168.224.6 60 NX
TTL rl:ip_192.168.224.6
EXEC
UNWATCH
Note how rl:ip_192.168.224.6 is our key name here: the prefix says that key refers to rate limiting(we might use Redis for other things as well!) and that ip word tell us a bit more on how we have identified the request.
Our trait implemented
Now we just have to reproduce the same exact sequence of instruction from our trait implementation for the FixedWindowRateLimiter struct:
impl RateLimiter for FixedWindowRateLimiter {
    fn check_request(
        &self,
        request_identifier: RequestIdentifier,
    ) -> Result<RateLimiterResponse, RateLimiterError> {
        let key = &self.build_request_key(request_identifier);

        let mut con = self.redis_client.get_connection()?;

        let (executed_request_counter, expire_in_seconds): (u64, u64) =
            redis::transaction(&mut con, &[key], |con, pipe| {
                pipe.cmd("INCR")
                    .arg(key)
                    .cmd("EXPIRE")
                    .arg(key)
                    .arg(self.window_validity.as_secs())
                    .arg("NX")
                    .ignore()
                    .cmd("TTL")
                    .arg(key)
                    .query(con)
            })?;

        let response = if executed_request_counter <= self.window_size {
            RateLimiterResponse::RequestAllowed(RequestAllowed {
                remaining_request_counter: self.window_size - executed_request_counter as u64,
            })
        } else {
            RateLimiterResponse::RequestThrottled(RequestThrottled {
                retry_in: Duration::from_secs(expire_in_seconds),
            })
        };

        Ok(response)
    }
}
Our redis crate syntax is actually self explanatory:
- First of all we get a connection to our Redis instance;
- We create a transaction using the acquired connection and key;
- We define and execute our sequence of commands with the help of the
queryutility; - We finally return the rate limiter response object to the caller, including the details which will help us satisfying our initial requirements.
I did not talk much about the build_request_key function, but its responsibility should be clear 😃. The interested reader can find its default implementation on the RateLimiter trait.
The beauty of error handling in Rust
The bit I'd highlight here instead is the use of the magic ? operator, as it's a chance to see how error handling is yet another strength of Rust.
Without being verbose at all in this method, we're basically asking the compiler to propagate upstream any RedisError returned by the crate we depend upon. But it's not just that! Our method signature states that it will return a RateLimiterError type (described above) in case of any error.
So... What kind of magic is happening here ?
In order for our code to compile, the compiler has to know how to map a RedisError into a RateLimiterError. Without any information about this conversion, the compiler will reject building:
$ cargo build
~>
   ...
   Compiling rate-limiter-rs v0.1.0 (/Users/andrea.dilisio/Documents/Personal/Projects/rate-limiting/rate-limiter-rs)
error[E0277]: `?` couldn't convert the error to `RateLimiterError`
  --> src/builders/fixed_window.rs:60:15
   |
60 |             })?;
   |               ^ the trait `From<RedisError>` is not implemented for `RateLimiterError`
   |
   = note: the question mark operation (`?`) implicitly performs a conversion on the error value using the `From` trait
So, as suggested by the compiler itself 😲, we have to implement the From<RedisError> trait for our RateLimiter error:
impl From<RedisError> for RateLimiterError {
    fn from(redis_error: RedisError) -> Self {
        match redis_error.kind() {
            redis::ErrorKind::InvalidClientConfig =>
              RateLimiterError::InitError(redis_error),
            _ => RateLimiterError::IoError(redis_error),
        }
    }
}
With the above hint the compiler knows how to finally map a RedisError into one of our custom error variants. We could be way more accurate in discriminating RedisErrors in the from function, but we're happy with the _ catch-all in this first version of our library.
Notice the verbosity the compiler in this case. At first you might get bored of the compiler due to its pedantry, but its output is actually one of the most powerful way of learning and getting familiar with Rust 😀. And cargo is surely one of the most accurate and complete build tool / package manager I've ever worked with.
Testing our library
Now that we went through the main implementation details of our library, we can approach some tests. I've skipped some information about how we could structure the project but the interested can jump on the source code available of my Github to clear any open point.
To be comfortable using our library, let's define a few tests to:
- make sure that the rate limiting algorithm actually works 😅
- verify that error scenarios are handled properly
Let's start by checking that in case of connection errors to a Redis instance, our check_request function returns a proper RateLimiterError. I think it's easier to start with, as we're testing an interim step in our algorithm. Moreover it comes handy, as we did not talk yet about how booting a Redis instance locally. We'll touch that later.
One of the features of testing in Rust is that you can include your test functions on the same file where the productive code is defined. Moreover, with the help of a special #[cfg(test)] directive we can make sure our tests won't be compiled into our library when released.
#[cfg(test)]
mod test {
  #[test]
  fn should_yield_a_connection_error() {
        //arrange
        let rate_limiter = RateLimiterFactory::fixed_window()
            .with_redis_settings(RedisSettings {
                host: "redis".to_string(),
                port: 6379,
            })
            .build()
            .unwrap();
        let ip = generate_random_ip();
        let request_identifier = RequestIdentifier::Ip(ip);

        //act
        let res = rate_limiter.check_request(request_identifier);

        //assert
        assert!(res.is_err());
        assert!(matches!(
            res.unwrap_err(),
            RateLimiterError::IoError(redis::RedisError { .. })
        ))
  }

  // utility test method to generate random IP addresses
  fn generate_random_ip() -> IpAddr {
        let mut rng = rand::thread_rng();
        IpAddr::V4(Ipv4Addr::new(
            rng.gen(), rng.gen(), rng.gen(), rng.gen()))
  }
}
Let's test our assertion again cargo test and verify that our test passes.
Let's now test our check_request behavior with a Redis instance available. We can use the basic, official Docker image for this purpose:
docker run -p 6379:6379 --name redis -d redis
Then, on the same .rs file as before, let's include a new test for the main algorithm behavior:
#[test]
fn should_check_request_eligibility() {
    //arrange
    let window_size = 5;
    let window_duration = Duration::from_secs(60);
    let rate_limiter = RateLimiterFactory::fixed_window()
        .with_window_size(window_size)
        .with_window_duration(window_duration)
        .build()
        .unwrap();
    let request_identifier =
        RequestIdentifier::Ip(generate_random_ip());

    for n in 1..=2 * window_size {
        //act
        let res = rate_limiter
            .check_request(request_identifier.clone())
            .unwrap();

        if n <= window_size {
            let allowed_res = res.as_allowed();
            assert_eq!(
                allowed_res.remaining_request_counter,
                cmp::max(0, window_size as i64 - n as i64) as u64
            )
        } else {
            let tolerance_secs = window_duration.as_secs() * 5 / 100;
            let throttled_res = res.as_throttled();
            let retry_in_secs = throttled_res.retry_in.as_secs();
            assert!(
                retry_in_secs > 0 && retry_in_secs
                    <= window_duration.as_secs(),
                "retry in is not in valid range"
            );
            assert!(
                window_duration.as_secs()
                    - throttled_res.retry_in.as_secs()
                    <= tolerance_secs,
                "retry_in suggestion is greater than tolerance of {0}s",
                tolerance_secs
            )
        }
    }
}
Let's review the contents on the above test:
- in the
//arrangesection we create an instance of a rate limiter allowing a maximum of 5 requests from the same IP address during a 1 minute time window; - we then have a loop of 10 iterations (quite arbitrary number, twice as
window_size) where- we call our main
check_requestalways with the samerequest_identifier; - we assert on the returned
RateLimiterResponseobject;
- we call our main
- in the first five iterations we call an internal
as_allowed()utility (available during tests only!) which verifies (panic otherwise) that the returned variant is of typeRequestAllowed. Moreover we assert on the outstanding request budget; - Similarly, in the last five iterations we verify that the returned variant is of type
RequestThrottledand that theretry_infield matches our expectations.
By running this test and verifying that all our tests pass, we can be pretty comfortable with our first rate limiter implementation and we can think of finally using it on one of our existing projects.
The interested reader can spy on a few other test improvements which I included in the original source code:
- parametrized tests with the help of the rstest framework;
- few other tests on builders and other internal methods used by the library;
- cargo nextest extension for an improved test performances and readability, both locally and at CI time.
Using it
We can finally approach the last part of this blog post, where we'll see our rate limiter in action.
Our pilot project
For this demo I'll use a very basic API project built on the Actix web framework. Our pilot project, namely carbon-intensity-api, has just a couple of endpoints:
- a
GET /health_checkendpoint, that returns200whenever the API is up and running; - a
GET /carbon/intensityendpoint, returning an indication (currently fake) of the carbon intensity at the time the request was fired.
Building blocks
Our project structures is simple as this:
- an application unit, that models the API instance;
- the usual library and binary files, very common in Rust projects;
- a settings class, to give our API some degrees of configurability;
- a routes directory, including our two above mentioned endpoint definitions.
It would be pointless and counterproductive 😅 to rate limit the health_check endpoint. Let's see how we can easily narrow our focus on the carbon intensity endpoint only.
Actix middlewares, a TLDR;
To add rate limiting to our API we'll introduce a middleware. Conceptually, a middleware is a component which helps us adding some extra behavior to an existing endpoint, without modifying the endpoint code per se. To quote Actix docs:
Typically, middleware is involved in the following actions:
- Pre-process the Request
- Post-process a Response
- Modify application state
- Access external services (redis, logging, sessions)
Hence, a perfect fit for our rate limiter checks.
Creating and registering a custom middleware in Actix is probably not the best nor the simplest piece of code you'll write, but it's probably the safest option to choose, as it's a way to plug extra behavior to your project without changing its code too much nor polluting the business logic with undesired technical, framework related complexity.
I'm not going to discuss the details of how you could write a middleware: for the purpose of this post it's enough to know that the rate limiter library that we've built above will be invoked in the context of a call function with the below signature
fn call(&self, req: ServiceRequest) -> Self::Future {
    ... custom logic...
}
And that our rate limiter instance will be an attribute of the same middleware object.
If you're curious about the Nitty Gritty details of an Actix middleware codebase, this article will surely help you out.
Injecting our rate limiter
So, let's see our invocation now:
fn call(&self, req: ServiceRequest) -> Self::Future {
let service = self.service.clone();
let rate_limiter = self.rate_limiter.clone();
  async move {
    let ip_address = req
        .connection_info()
        .realip_remote_addr()
        .ok_or_else(||
            ApiError::InvalidRequest(
                "Missing IP address!".to_string()))?
        .parse()
        .map_err(|e: AddrParseError|
            ApiError::Internal(e.to_string()))?;

    let request_identifier = RequestIdentifier::Ip(ip_address);

    let rate_limiter_response = rate_limiter
        .check_request(request_identifier);

    return match rate_limiter_response {
      Ok(response) => {
        return match response {
            RateLimiterResponse::
              RequestAllowed(RequestAllowed {
                  remaining_request_counter,
            }) => {
              let mut inner_service_response =
                  service.call(req).await?;

              inner_service_response.headers_mut().insert(
                  HeaderName::from_str(
                      RATE_LIMITER_REMAINING_REQUEST_HTTP_HEADER_NAME,
                  )
                  .map_err(
                      |e: InvalidHeaderName|
                        ApiError::Internal(e.to_string()),
                  )?,
                  HeaderValue::from_str(
                      remaining_request_counter.to_string().as_str(),
                  )
                  .map_err(
                      |e: InvalidHeaderValue|
                        ApiError::Internal(e.to_string()),
                  )?,
              );

              Ok(inner_service_response)
            }
            RateLimiterResponse::RequestThrottled(
                RequestThrottled { retry_in }) => {
                    log::warn!("request throttled
                        for ip={}", ip_address);

                    return Err(ApiError::RequestThrottled {
                        retry_after_seconds: retry_in.as_secs(),
                    }
                    .into());
            }
        };
      }
      Err(_err) => {
        log::warn!("unable to check rate limit for request coming
            from ip={}. Skipping validation", ip_address);
        Ok(service.call(req).await?)
      }
    };
  }
  .boxed_local()
}
Let's go through the 3 main steps of the above code snippet:
- We get the request IP address, relying on the realip_remote_addr utility offered by Actix. In the unlikely case we're not able to identity the IP, we return an error;
- We invoke the rate limiter component. Notice the use of the
selfkeyword: the rate limiter is part of our rate limiter instance; - We match the response of the library and based on the returned response variant we decide what to do next:
- if
RequestAllowedwe invoke the carbon intensity endpoint with theservice.call(req)syntax; Worth highlighting the fact that the target service invocation is completely generic: this will give us the ability to potentially use the same middleware on different endpoints without changing the code! - if
RequestThrottledwe avoid calling the internal endpoint and we build an API error object; - in case of errors returned by the rate limiter library, we log a warning message and we move on with the carbon intensity endpoint invocation, as if the request was allowed.
- if
Configuring it
Finally, let's see how we can configure our rate limiter instance at boot time in our project:
impl Application {
    /// Builds the main app entrypoint
    pub fn build(settings: AppSettings) -> Self {
        let rate_limiter = RateLimiterFactory::fixed_window()
            .with_window_size(settings.rate_limiter.window_size)
            .with_window_duration(Duration::from_secs(
                settings.rate_limiter.window_duration_seconds,
            ))
            .with_redis_settings(RedisSettings {
                host: settings.rate_limiter.redis_server.host,
                port: settings.rate_limiter.redis_server.port,
            })
            .build()
            .expect("unable to setup rate limiter component");

        let server = HttpServer::new(move || {
            App::new()
                .wrap(Logger::default())
                .route("/health_check", web::get().to(health_check))
                .service(
                    web::scope("/carbon/intensity")
                        .wrap(RateLimiterMiddlewareFactory
                            ::with_rate_limiter(Rc::new(
                                rate_limiter.clone())
                            ))
                        .route("", web::get().to(get_intensity)),
                )
        });

        let actix_server = server
            .bind((settings.http_server.host, settings.http_server.port))
            .expect("unable to build app");

        let port = actix_server.addrs()[0].port();
        let http_server = actix_server.run();
        Application { http_server, port }
    }
}
The above code should be quite self explanatory: we're just building the rate limiter instance and registering
it on our API. The only bit probably worth highlighting here is the use of the reference-counting struct Rc, which is a consequence of both how Actix HttpServer works and how we can borrow references in Rust.
Testing our setup
Believe it or not, we're basically done with coding. At this point we just have to define a bunch of integration tests to validate our setup. I've written a few of them, which are available on my repository. I'll skip their review here.
Basic, manual tests
Instead, let's refocus on our initial requirements and validate the expressiveness of our solution with a couple of manual tests. To do so, let's start our API locally and invoke it via a browser or CLI tool:
$ http :8080/carbon/intensity
~>

HTTP/1.1 200 OK
Connection: keep-alive
Content-Length: 114
Content-Type: application/json
Date: Fri, 03 Feb 2023 14:35:58 GMT
Server: nginx/1.23.3
x-remaining-request: 4

{
    "from": "2018-01-20T12:00Z",
    "intensity": {
        "actual": 263,
        "forecast": 266,
        "index": "Moderate"
    },
    "to": "2018-01-20T12:30Z"
}
As expected, the first request will go through and return some (currently static) carbon intensity data. We can also see the extra information about the remaining budget of 4 request in the current window for our IP address, passed with the x-remaining-request HTTP response header: we should expect the same exact response (except for the x-remaining-request value 😀) for the next 4 attempts.
If we call our endpoint for 5 more times, on the overall 6th attempt we will get a very explicit error:
$ http :8080/carbon/intensity
~>

HTTP/1.1 429 Too Many Requests
Connection: keep-alive
Content-Length: 22
Date: Fri, 03 Feb 2023 14:36:19 GMT
Server: nginx/1.23.3
retry-after: 40

You've been throttled!
Both the standard 429 HTTP status and the Retry-After header should make us feel happy with the result!
Simulating a burst of request
Let's try to make this test a bit more robust by simulating much more requests simultaneously.
Docker compose setup
To do that, we'll boot a slightly more complex deployment locally with the help of Docker compose. Our deployment will be made of:
- 1 Redis server;
- 3 Carbon intensity API replicas;
- 1 load balancer/reverse proxy sitting at the edge of our setup, which will receive HTTP requests on port 8080 and forward those to the API.
The compose file for the test stack I'm talking about is available on my repository. To have that running locally, we just have to run a docker-compose up command from the carbon-intensity-api root folder.
Generating load with k6
With the help of k6 we'll then generate 500 requests to our GET /carbon/intensity endpoint simultaneously, using 25 virtual users/threads. If our rate limiting logic works as expected, only 5 requests should succeed and we should get 429s for the rest.
Let's revive some Javascript skills now and define a distributed_test.js file:
import http from 'k6/http';
import { Counter } from 'k6/metrics';
import { check } from 'k6';

const api_responses = new Counter('api_responses');

export const options = {
    vus: 25,
    iterations: 500,
    thresholds: {
        'api_responses': [
            'count == 100'
        ],
        'api_responses{status:429}': [
            'count == 495'
        ],
        'api_responses{status:200}': [
            'count == 5'
        ],
    },
};

export default function () {
    const res = http.get('http://localhost:8080/carbon/intensity');

    api_responses.add(1, {status: res.status})

    const output = check(res, {
        'Status code is either 200 or 429': (r)
            => r.status === 200 || r.status === 429,
    });
}
By running the above script from the CLI with k6 run distributed_test.js, we should be able to validate our
load test results:
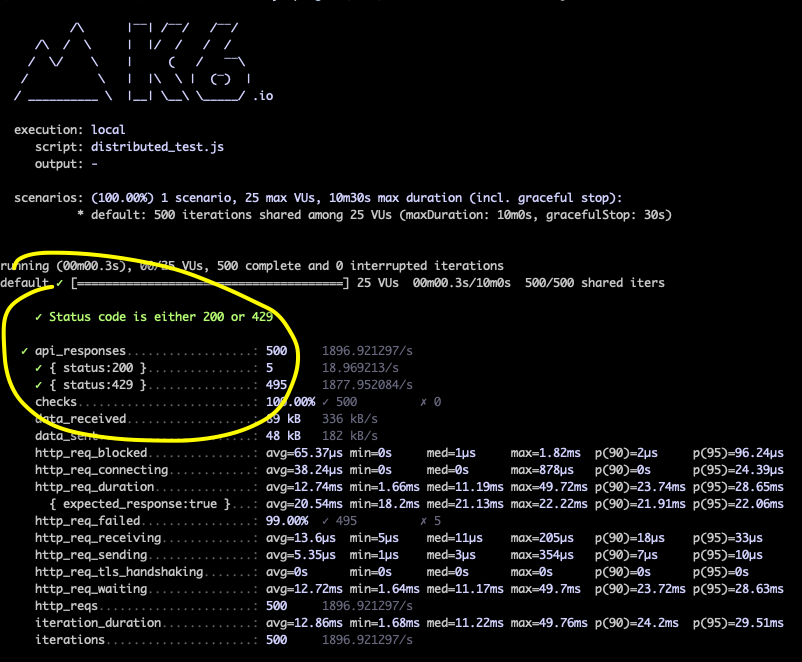
And... yay! 🎉
Bonus points: Sliding window algorithm
Before wrapping up, let's very briefly mention one last potential improvement (for now!) for our library.
As we saw, the biggest drawback of the Fixed window algorithm is that it can't really prevent limits overflows if burst of requests are hitting our API across two adjacent windows.
To overcome this limitation, we could have implemented instead a Sliding window algorithm, leveraging Redis sorted sets. Interested readers that are still alive at this point can check a sample sliding window rate limiter implementation on the same rate-limiter-rs project.
Final considerations
We finally got to the end of this article/experiment. The solution I've showed is far from being production ready and surely not free from bugs, but it helped me becoming more comfortable with the topic of rate limiting and a bit more proficient than I was in Rust, which were the objectives that I had in mind when I started this initiative.
What I've realized while doing this exercise - and writing about that! - is that rate limiting is a complex and nuanced problem space, with many tradeoffs that most of the times are not even expected at the beginning of an investigation. As such, whilst there are algorithms and best practices around to drive you towards a very robust solution, it's important to understand that it's up to you to find the approach that best fits your particular case and solve your actual problems.
To conclude, all the code snippets shown on this article are taken from my rate-limiting repository, which is public and more than open for contributions 👋.